
 Sizing a ring is pretty easy. It just takes a little applied mathematics. First, determine the inner diameter of the desired ring size. Then, take the inner diameter, add the thickness of your wire and multiply by pi…3.14.
Example: To make a size 7 ring with 14 gauge wire (1.63mm thick) follow this calculation.
To 17.35 (inner diameter of size 7) add 1.63 (thickness of 14 gauge wire) for a total of 18.98. Multiply 18.98 by pi (3.14) for a grand total of 59.60mm (total length of wire needed…see SPECIAL NOTE)
In this case, round the measurement up to 60mm. When cutting your wire stock, make sure that it is straight along your measuring tool for an accurate cut. Also, use a quality flush cutter. This prevents having to sand off a large amount of wire in order to solder two perfect wire ends together.
SPECIAL NOTE:
Keep in mind that after soldering the wire ends together your metal will be soft. Treat it with care so as not to mar the ring surface. Also, it’s important to remember that wire will expand when hammered. Therefore, please follow the guidelines below. Depending on the manner of your hammer blows the ring could possibly become larger than intended. Use your ring mandrel to regularly check sizing.
- Reduce your wire length by 1/4 size to allow for shaping your ring after soldering.
- Reduce your wire length by 1/2 size to allow for stamping or embossing your ring after soldering.
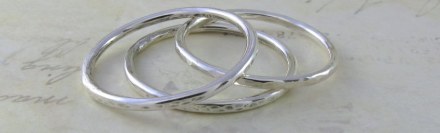
Your may add interest to your ring by lightly hammering the outer surface using either end of a chasing hammer. Or perhaps by using a metal stamping tool, such as a “period” or “starburst” to create a design. Wire stock is sold in many forms as well. Round, square, beaded and patterned wire, to name a few, will add an artistic dimension to your rings.
There are numerous educational websites to help the jewelry maker along his or her way. I personally prefer to visit Rio Grande, Beaducation and Contenti on the web for my jewelry making supplies and additional help in the way of videos and blogs. A wonderful YouTube channel features Mr. Soham Harrison who masterfully takes the jewelry making student to more involved levels. Additionally, there are myriads of sites devoted to US and UK ring sizes, wire gauge sizes and ring calculators.
You just might be surprised at how satisfying and enjoyable calculating the exact ring measurements may be. Not to mention having a new set of stack rings to wear!
TOOLS FOR THIS PROJECT:
- 14 gauge sterling silver wire (copper wire can be used for practice if desired)
- flush cutter
- measuring ruler, caliper or sliding gauge in mm
- #2 file
- soldering equipment *
- finishing and polishing equipment*
* To be covered in a subsequent lesson.
If you have any questions or comments regarding this article or jewelry making in general please be sure to leave them in the comment box below. Thank you!

